In iOS 16 Apple has introduced the new ActivityKit to work with Live Activity to display your app’s most current data on the iPhone Lock Screen and in the Dynamic Island.
Meanwhile on the iPhone 14 pro family we have seen the new Dynamic Island 🏝 which is user interactive to display basically what the Live Activity is doing and to allow the user to interact with the app’s live data.
in this Article we will take a deep dive into both feature and how to work with via widget extension, the Live Activity uses WidgetKit & SwiftUI for their user interface, ActivityKit’s role is to handle the life cycle of each Live Activity: You use its API to request, update, and end a Live Activity; each of the life cycle states can be triggered with a remote notification or inside the app whenever you want to.
Live Activities are only available on iPhone.
We will be creating a train station app that will show the user live feed of the choosen train stops and when will the train will be at thire station
First lets create a new iOS project and setup our Content view
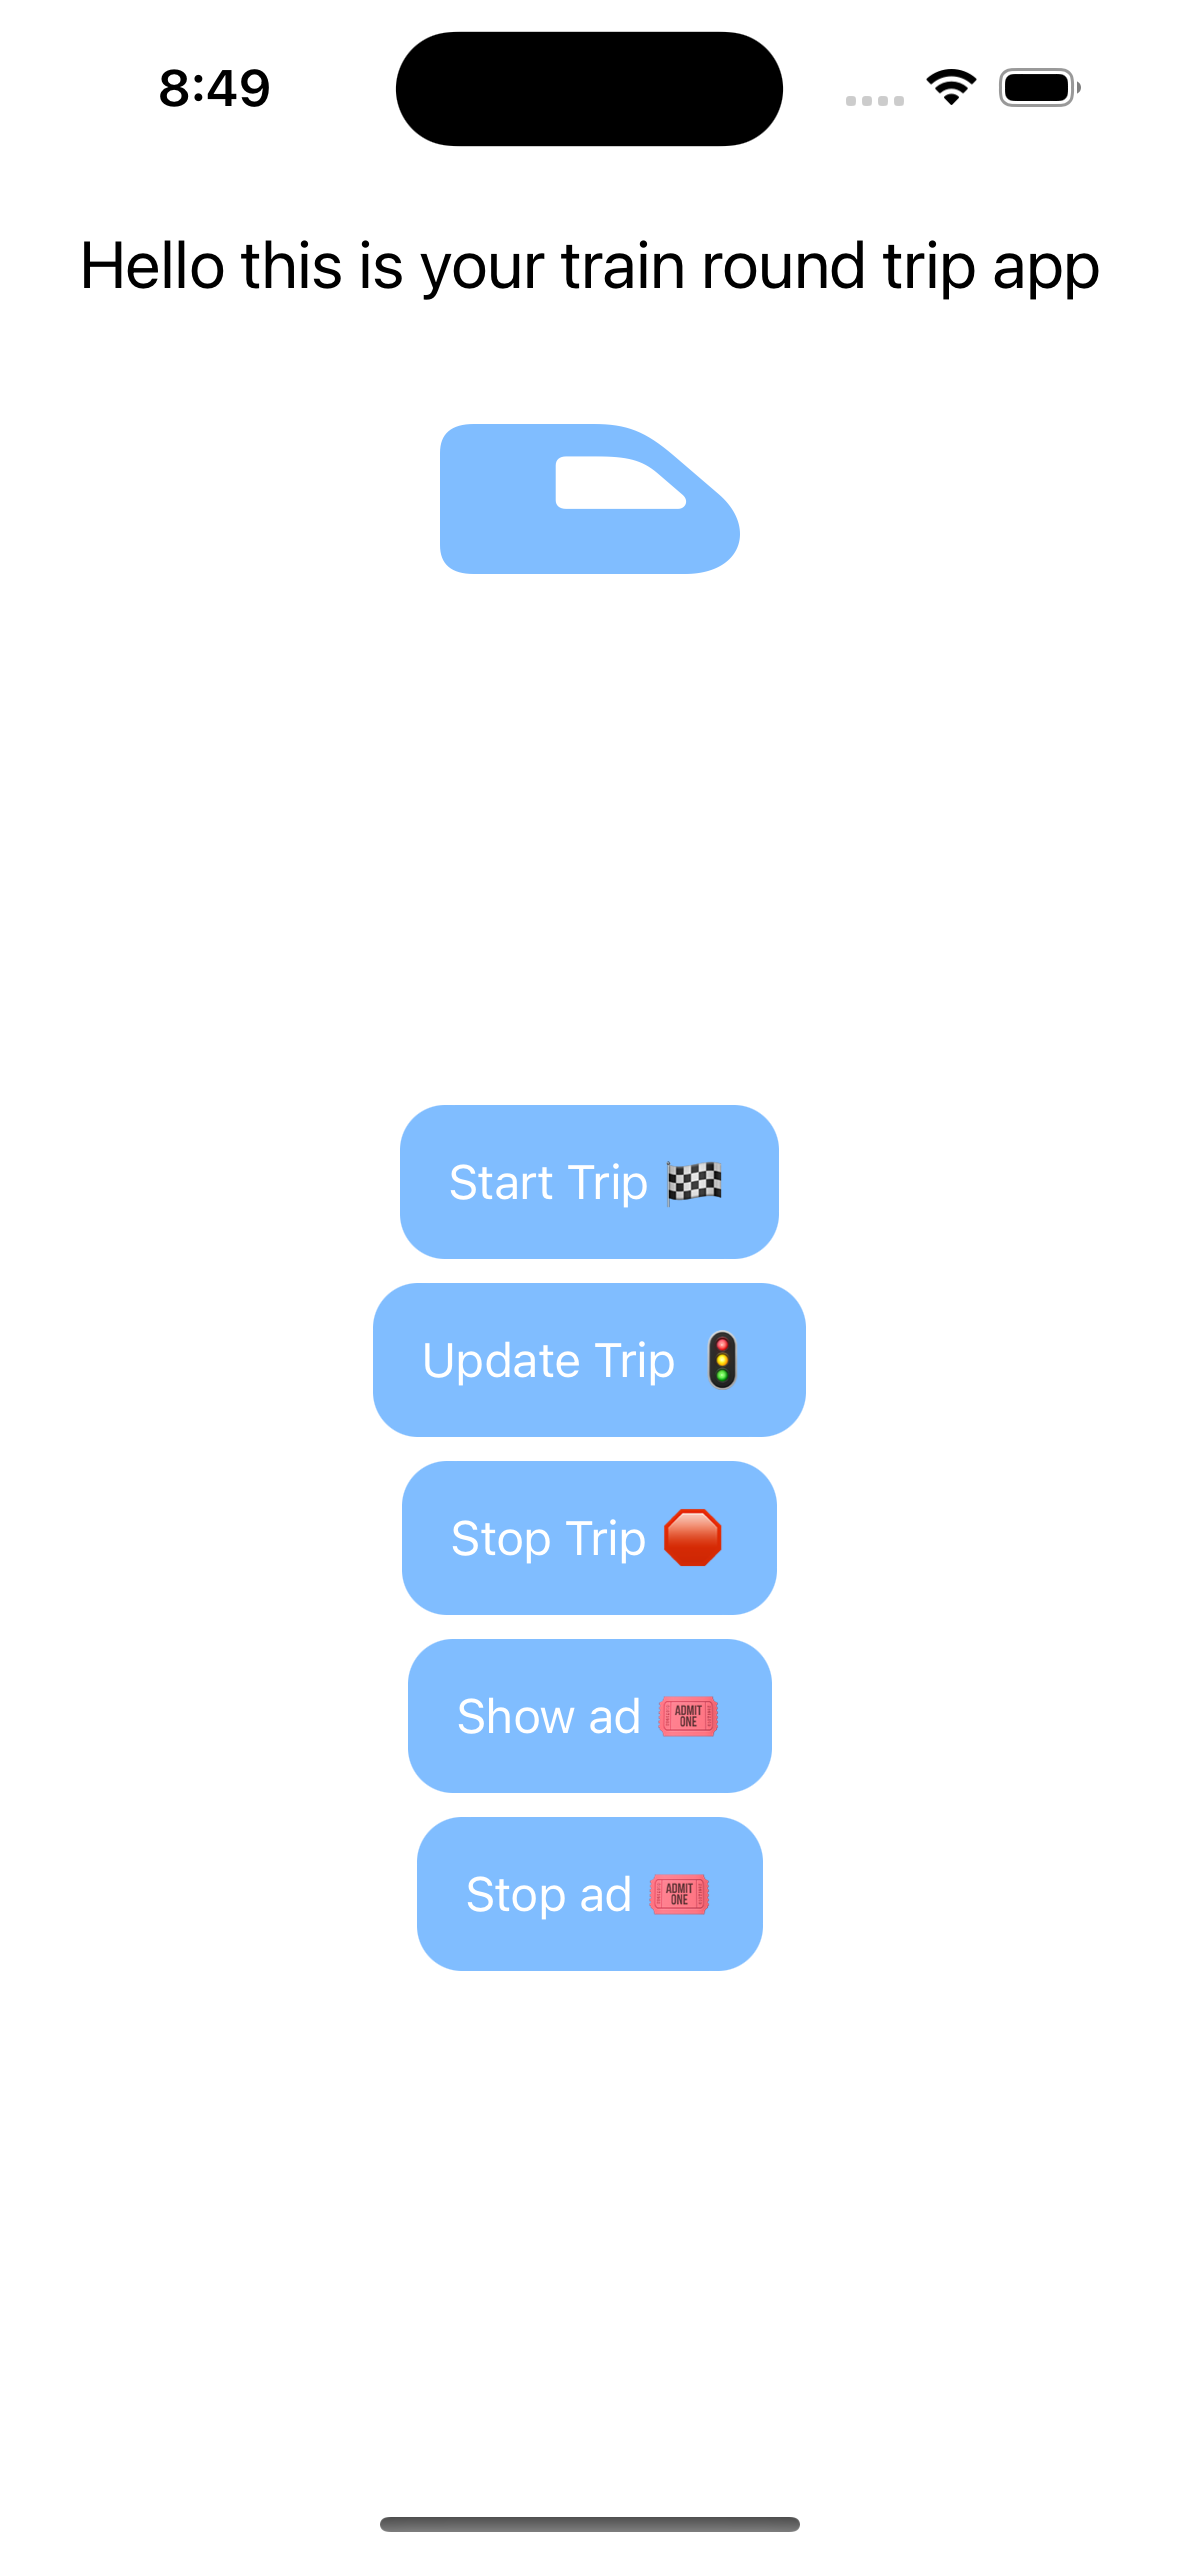
Our ContentView will have 5 simple buttons that will trigger the life cycles of the Live Activity
        VStack{
            Text("Hello this is your train round trip app")
                .font(.title2)
                .padding()
            Image(systemName: "train.side.front.car")
                .resizable()
                .frame(width: 100,height: 50)
                .padding()
                .foregroundColor(.blue.opacity(0.5))
            Spacer()
            VStack{

                Button("Start Trip 🏁") {
                    startTrip()
                }
                .setButtonLook()
                Button("Update Trip 🚦") {
                    updateTrip()
                }
                .setButtonLook()
                Button("Stop Trip 🛑") {
                    stopTrips()
                }
                .setButtonLook()
                Button("Show ad 🎟") {
                    shoeTripAd()
                }
                .setButtonLook()
                Button("Stop ad 🎟") {
                    stopAd()
                }
                .setButtonLook()

            }
            Spacer()


        }
        .font(.callout)
After we have done our ContentView lets create a new widget extension we will use the name “LiveTripDemo”
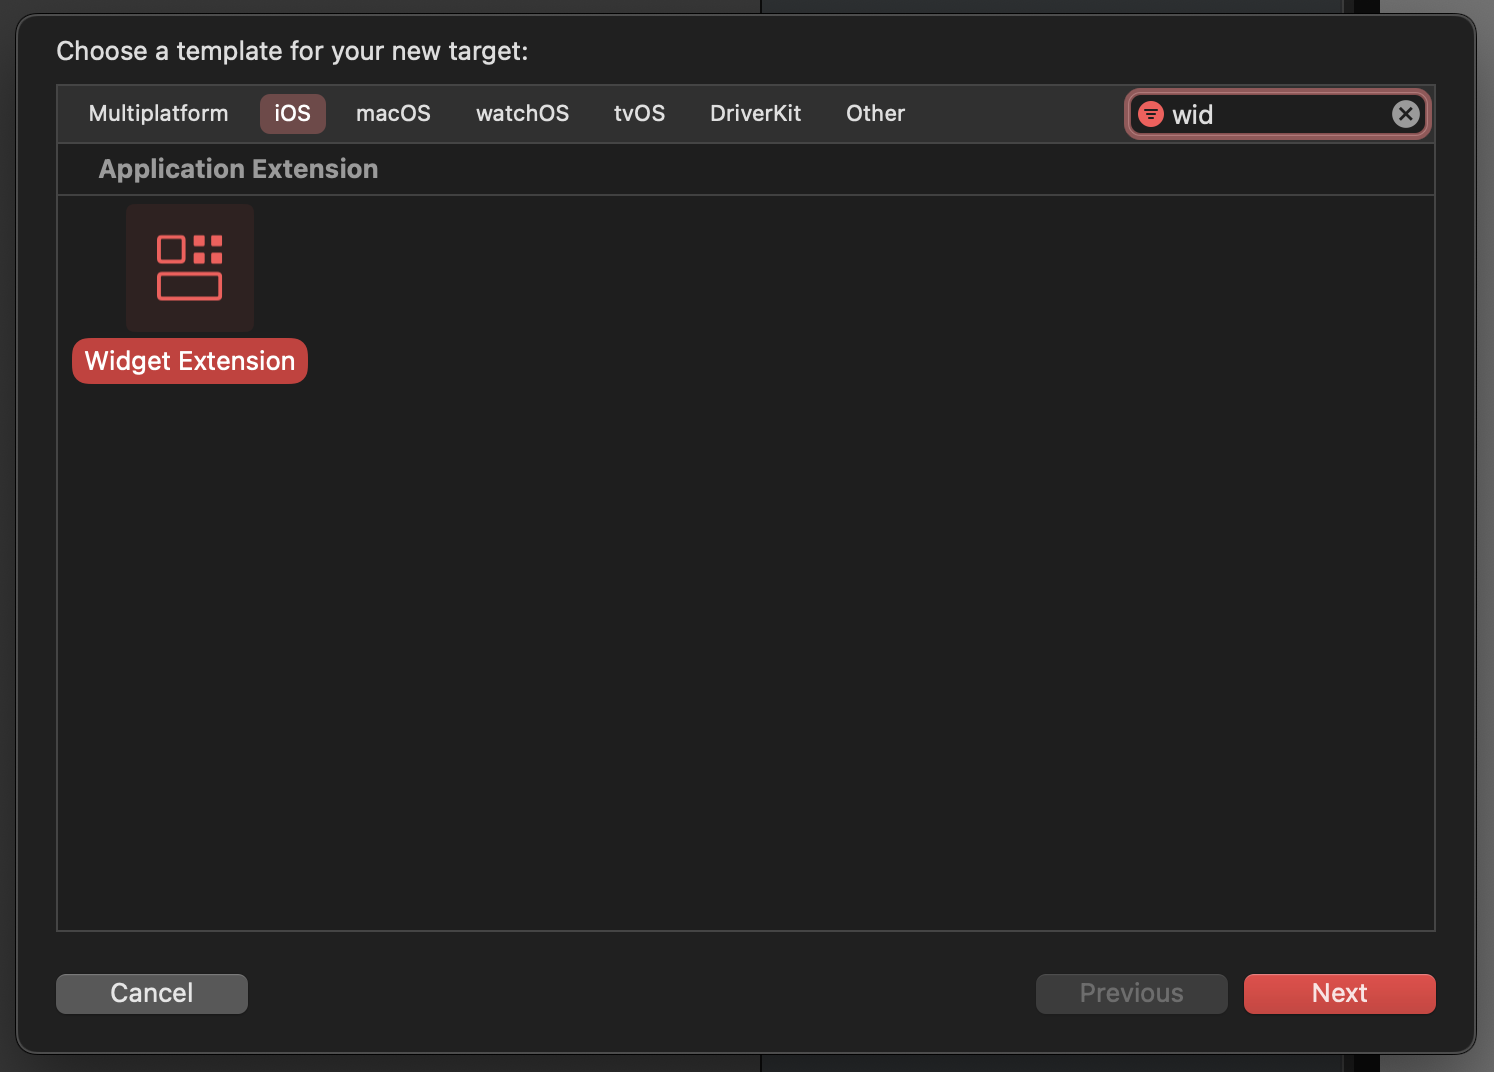
Once Created we will have a new target in our project for our widget
Add "Supports Live Activities" to both info.plist in both targets the widget and the iOS app
We will have 3 files created by Xcode
1- LiveTripDemoBundle : we will keep this one as is
2- LiveTripDemoLiveActivity : this is your Live activity view which will have a Dynamic Island too we will use it to display live train status
3- LiveTripDemo : this is your typical widget but we will use it too for Live Activity as an Ad for the station
4- LiveTripDemoAttributes : we will use the ActivityAttributes to trigger each states of the Live Activity, request, update, and end Activity
We will be createing a new ActivityAttributes struct to display our Ad for the train station “TripAdDemoAttributes”
struct LiveTripDemoAttributes: ActivityAttributes {

    public typealias TripStatus = ContentState


    public struct ContentState: Codable, Hashable {

        // Dynamic stateful properties about your activity go here!

        var value: Float

    }

}

struct TripAdDemoAttributes: ActivityAttributes {

    public typealias TripStatus = ContentState


    public struct ContentState: Codable, Hashable {

        // Dynamic stateful properties about your activity go here!

        var value: Float

    }

}
Both of those structs should be exposed to both targets the Widget and the iOS app
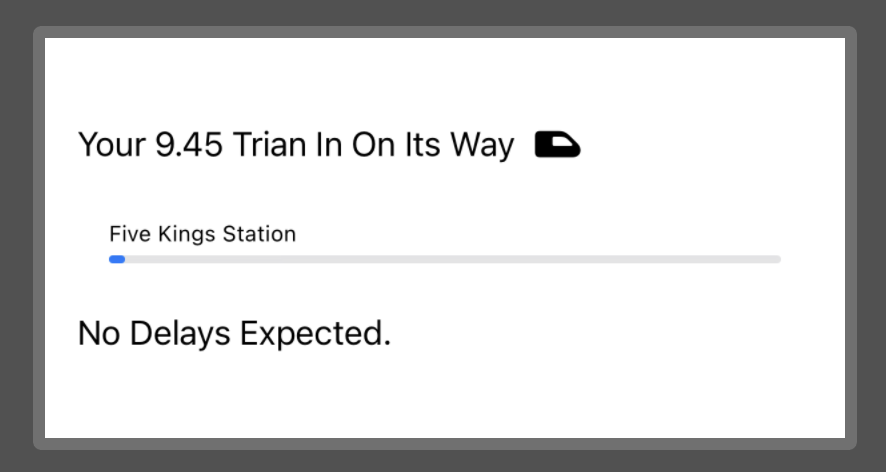
We have prepared a View to use inside of the Live Activity to simplify things where we just call our view
struct TrainTripView: View {

    @State var trinDistance : Float

    @State var shouldShowDistance : Bool = true

    var body: some View {

        VStack{

            HStack{

                Text("Your 9.45 trian in on its way".capitalized)

                Image(systemName: "train.side.front.car")

                Spacer()

            }

            if shouldShowDistance {

                ProgressView("Five Kings Station", value: trinDistance, total: 100)

                    .padding()

                    .font(.caption2)

            }

            HStack{

                Text("no delays expected.".capitalized)

                Spacer()

            }

        }

        .padding()

    }

}
Now inside of the LiveTripDemoLiveActivity add the following code
struct LiveTripDemoLiveActivity: Widget {
var body: some WidgetConfiguration {
ActivityConfiguration(for: LiveTripDemoAttributes.self) { context in
// Lock screen/banner UI goes here
TrainTripView(trinDistance: context.state.value)
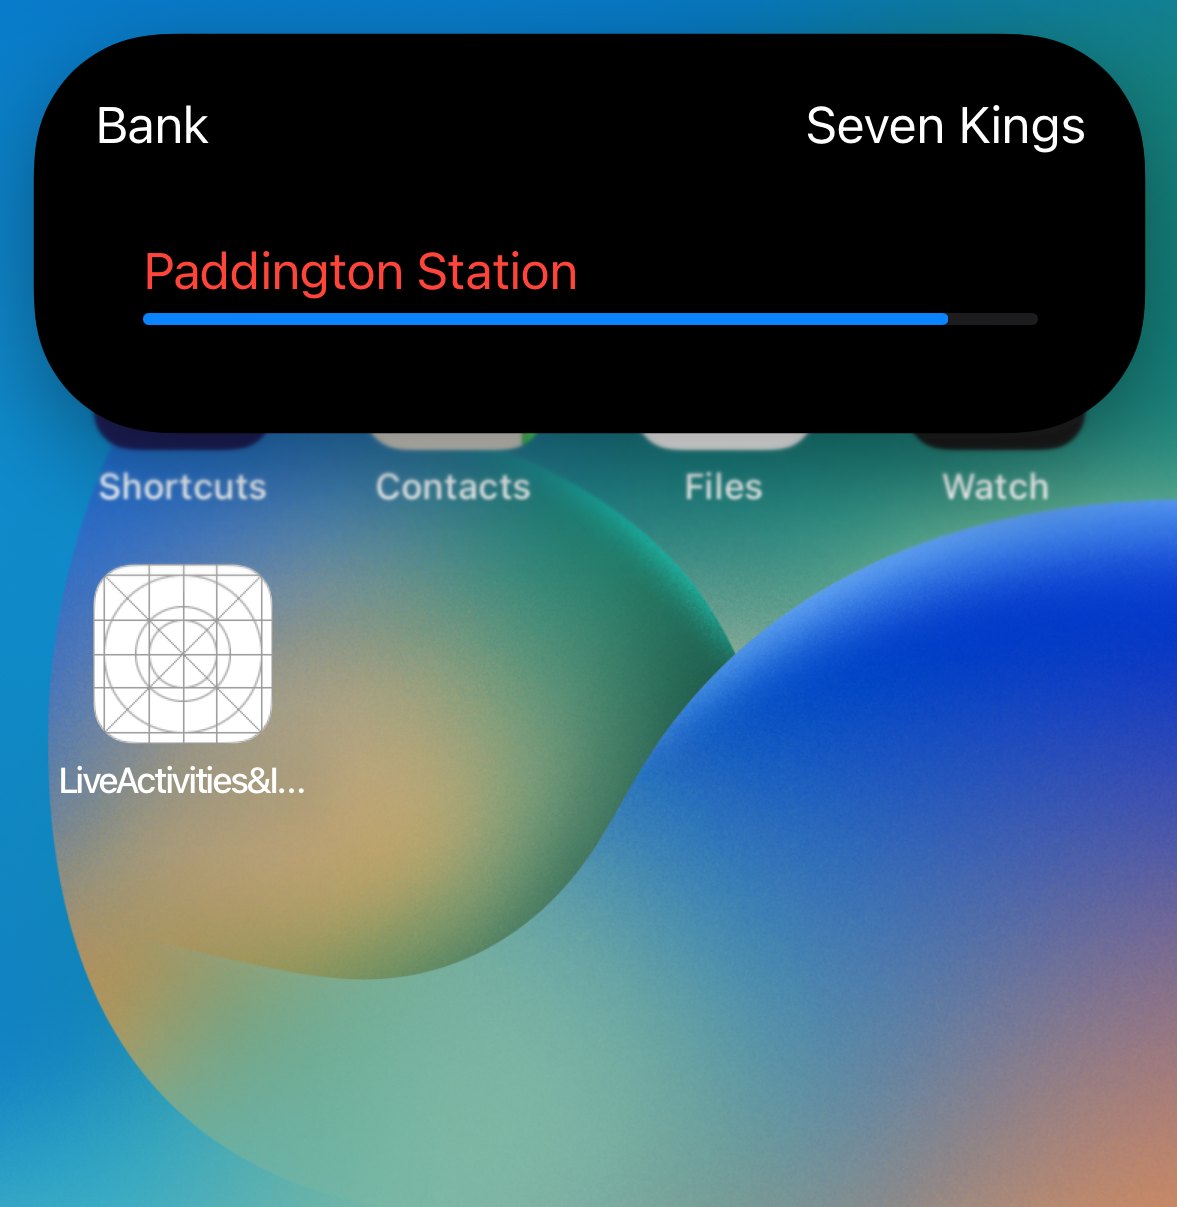
} dynamicIsland: { context in
DynamicIsland {
// Expanded UI goes here. Compose the expanded UI through
// various regions, like leading/trailing/center/bottom
DynamicIslandExpandedRegion(.leading) {
Text("Bank")
}
DynamicIslandExpandedRegion(.trailing) {
Text("Seven Kings")
}
DynamicIslandExpandedRegion(.bottom) {
ProgressView("Paddington Station", value: context.state.value, total: 100)
.padding()
.foregroundColor(.red)
// more content
}
} compactLeading: {
Text("BK")
} compactTrailing: {
Text("SK")
} minimal: {
Text("Paddington")
}
.widgetURL(URL(string: "http://www.apple.com"))
.keylineTint(Color.red)
}
}
}
and inside of the LiveTripDemo add the following code
struct LiveTripDemo: Widget {

    let kind: String = "LiveTripDemo"
    var body: some WidgetConfiguration {

        ActivityConfiguration(for: TripAdDemoAttributes.self) { context in

            // Lock screen/banner UI goes here

            TrainTripView(trinDistance: context.state.value, shouldShowDistance: false)

        }  dynamicIsland: { context in

            DynamicIsland {

                // Expanded UI goes here.  Compose the expanded UI through

                // various regions, like leading/trailing/center/bottom

                DynamicIslandExpandedRegion(.leading) {

                    Text("Bank")

                }

                DynamicIslandExpandedRegion(.trailing) {

                    Text("Seven Kings")

                }

                DynamicIslandExpandedRegion(.bottom) {

                    Text("Next: Paddington Station")

                    // more content

                }

            } compactLeading: {

                Text("BK")

            } compactTrailing: {

                Text("SK")

            } minimal: {

                Text("Paddington")

            }

            .widgetURL(URL(string: "http://www.apple.com"))

            .keylineTint(Color.red)

        }

    }

}
To simplify in both Activities we used the Dynamic Island to display the same thing with some tweaks
Now your Live Activity is ready but we need to trigger it, call each of those functions inside your Content View by the assigned button to Start, Update or End an Activity
we will need ti import ActivityKit inside of our Content View
    func startTrip() {

        let liveTripAttributes = LiveTripDemoAttributes()

        let tripStatus = LiveTripDemoAttributes.TripStatus(value: 50)

        do{

            let tripActivity = try Activity<LiveTripDemoAttributes>.request(

                attributes: liveTripAttributes,

                contentState: tripStatus)

            print("Did request live trip activity \(tripActivity.id)")

        }catch(let error){

            print("Error requesting live activity \(error.localizedDescription)")

        }

    }

    func updateTrip() {

        Task{

            let tripStatus  = LiveTripDemoAttributes.TripStatus(value: 90)


            for activity in Activity<LiveTripDemoAttributes>.activities {

                await activity.update(using: tripStatus)

            }

        }

    }


    func stopTrips() {

        Task{

            for activity in Activity<LiveTripDemoAttributes>.activities {

                await activity.end(dismissalPolicy: .immediate)

            }

        }

    }


    @MainActor

    func shoeTripAd() {

        let liveTripAttributes = TripAdDemoAttributes()

        let tripStatus = TripAdDemoAttributes.TripStatus(value: 50)

        do{

            let tripActivity = try Activity<TripAdDemoAttributes>.request(

                attributes: liveTripAttributes,

                contentState: tripStatus)

            print("Did request live trip activity \(tripActivity.id)")

        }catch(let error){

            print("Error requesting live activity \(error.localizedDescription)")

        }

    }


    func stopAd() {

        Task{

            for activity in Activity<TripAdDemoAttributes>.activities {

                await activity.end(dismissalPolicy: .immediate)

            }

        }

    }
We're ready 🥳, Now simply run your application and start a trip to start an avtivity and test with the rest of the life cycle properties
you can find the whole project and code on Github here